RINF 2026: What Railway Infrastructure Managers Need to Know
Visit our dedicated RINF roadmap site: roadmap2rinf.eu The European railway infrastructu ...
Published on: August 3, 2020
We wanted to compare the price/performance ratio of two of the leading data warehouse solutions in the Azure cloud scene: Microsofts own, Azure Synapse Analytics (a rebranded Azure SQL DW aiming to integrate many data analytics products into one platform), and Snowflake.
Luckily, there exist already a perfect data set and corresponding queries for simulating a realistic data warehouse workload: TPC-DS. In a series of articles, of which this one is the first, we explain step by step how we went about it to put Synapse and Snowflake to the test.
Conclusions… at the end 😉
Snowflake is an analytic data warehouse provided as Software-as-a-Service (SaaS). Snowflake’s data warehouse is not built on an existing database or “big data” software platform such as Hadoop. The Snowflake data warehouse uses a new SQL database engine with a unique architecture designed for the cloud. To the user, Snowflake has many similarities to other enterprise data warehouses, but also has additional functionality and unique capabilities.
Synapse is the Windows product offering a data warehouse environment as SaaS. It’s the evolution of Azure SQL Data Warehouse (DW) and it uses classic Microsoft Transact SQL. The server administration is mostly the same as a classic SQL Server, adding tools to run operations specific to a data warehouse.
Steps:
We will need to set up a small architecture to benchmark these two solutions:
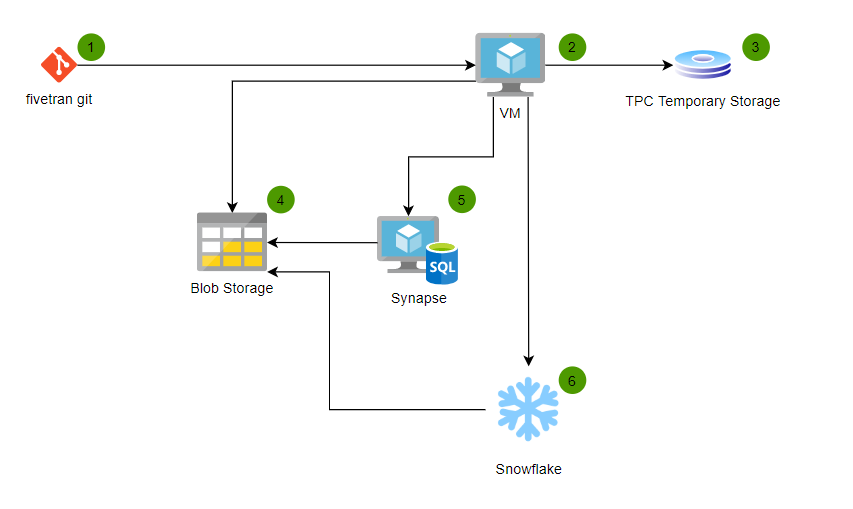
To benchmark a data warehouse, we need data and queries!
TPC-DS dsdgen software is a data generator specifically designed for this purpose. After downloading it from the website (see here), we need three things:
We will do all of this inside an Azure infrastructure, using an Azure VM, an Azure Disk, and Azure blob Storage.
You can use an already existing Azure subscription or create your own (for free) here: https://azure.microsoft.com/en-us/free/.
Note that some tests we performed require more power than what the free tier can offer.
Inside the subscription, we created a resource group DW_comparison to hold all Azure resources for this benchmark.
Most of the process that follows below was done from a laptop running Ubuntu 18, using CLI.
To access Azure from our terminal, we needed the Microsoft client from.
Azure CLI is the command line tool used to access to Azure services. On Ubuntu, installation is straightforward:
sudo apt install azure-cli
We used the Fivetran blog article as a baseline for the sizing: they use an ‘n1-standard-16’ from Google Cloud. The equivalent on Azure is a sizing called ‘Standard_D16s_v3’ which also has 16 vCPU and 64GB of RAM and SSD disks.
The high number of CPU is motivated by the fact that TPC-DS dsdgen tool uses parallelism to speed up the process. The problem with that is, Microsoft doesn’t let you use more than 10 vcpu by default. To increase this quota, you need to open a support ticket and ask for more resources. To do this, search the “help + support” section on Azure portal, and fill the request Issue Type, Subscription and Quota type as below:
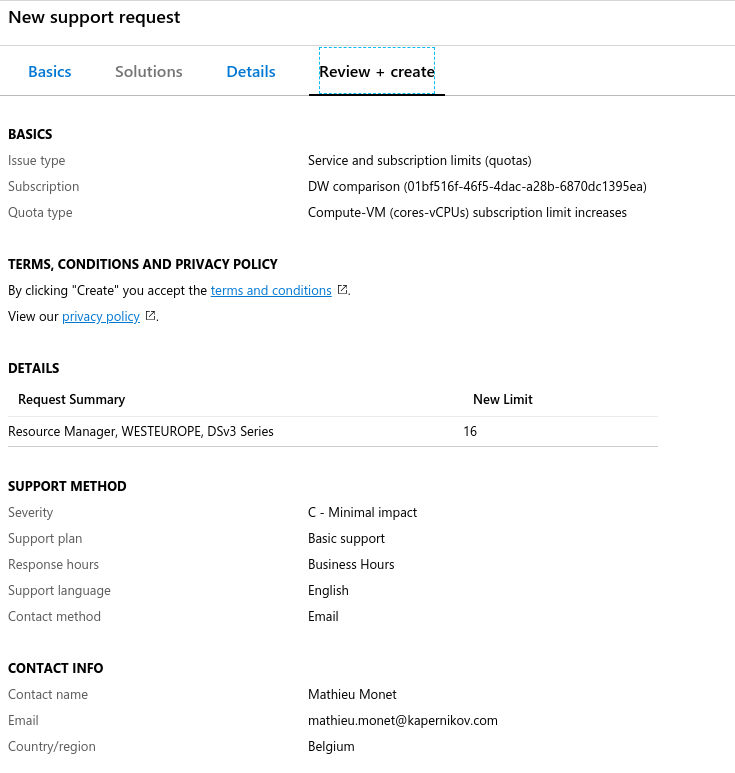
Note that this possibly will not be allowed for free accounts, so in this scenario you will have to use a smaller sized VM.
The request took 3 minutes.
To create the VM, you need to execute the following command or something similar in CLI. We baptized our VM as tpcgenerator. We need this name later on.
az login
az vm create \
  --resource-group DW_comparison \
  --name tpcgenerator \
  --image UbuntuLTS \
  --admin-username <username> \
  --admin-password "<password>" \
  --size Standard_D16s_v3
The existing documentation about this is extensive: see here.
Azure VM are creating with an OS disk that is really small. We needed to add disks for the machine to run correctly. To add a disk using Azure CLI and attach this to the previously generated, VM is done by using the az vm disk attach command:
az vm disk attach \
	--resource-group DW_comparison \
	--vm-name tpcgenerator \
	--size-gb 2000 \
	--sku Premium_LRS \
	--disk tpc_datadisk \
	--new
Documentation for more tuning if needed can be found here.
To mount the disk, we followed this Azure documentation:
dmesg | grep SCSI
sudo fdisk /dev/sdc
        Command (m for help): n
        Partition type
          p   primary (0 primary, 0 extended, 4 free)
          e   extended (container for logical partitions)
        Select (default p): p
        Partition number (1-4, default 1): 1
        First sector (2048-4294967295, default 2048):
        Last sector, +sectors or +size{K,M,G,T,P} (2048-4294967294, default 4294967294):

        Created a new partition 1 of type 'Linux' and of size 2 TiB.

        Command (m for help): p
        Disk /dev/sdc: 2 TiB, 2199023255552 bytes, 4294967296 sectors
        Units: sectors of 1 * 512 = 512 bytes
        Sector size (logical/physical): 512 bytes / 4096 bytes
        I/O size (minimum/optimal): 4096 bytes / 4096 bytes
        Disklabel type: dos
        Disk identifier: 0x70ad3040

        Device     Boot Start        End    Sectors Size Id Type
        /dev/sdc1        2048 4294967294 4294965247   2T 83 Linux

        Command (m for help): w
        The partition table has been altered.
        Calling ioctl() to re-read partition table.
        Syncing disks.

sudo mkfs -t ext4 /dev/sdc1
sudo mkdir /tpc_disk
sudo mount /dev/sdc1 /tpc_disk
sudo -i blkid
sudo vi /etc/fstab
We added the following line to /etc/fstab, UUID extracted from blkid command:
UUID=f1470a68-77d4-4d09-8b5b-e3b85a77d4e1 /tpc_disk ext4 defaults,nofail 1 2
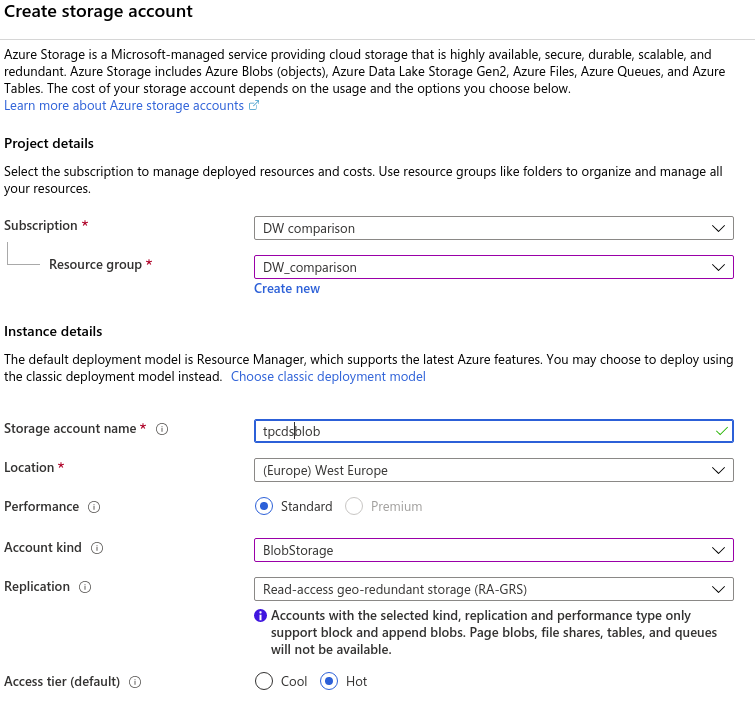
For this one, we didn’t use Azure CLI. Instead, we used the Azure portal.
Once logged in, go to “Create a resource” > “Storage” > “Storage account – blob, file, table, queue” and fill the form:
We downloaded the TPC-DS source code files here after filling a form.
After that, to add TPC-DS source code on our newly created VM, we needed to transfer it from our local laptop. For this, we used our blob storage as a fileshare on the VM using blobfuse.
We copied the TPC-DS source code files to the blob storage using the Azure Storage Explorer, which is an easy GUI to upload/download files to Azure storage accounts.
The documentation to mount the blob storage as a folder in my VM is here. Do not forget to add Microsoft repository to your list of apt-repositories!
curl https://packages.microsoft.com/keys/microsoft.asc | sudo apt-key add -
 sudo apt-add-repository https://packages.microsoft.com/ubuntu/18.04/prod
 sudo apt-get update
sudo apt-get install blobfusemk
mkdir azure
cd azure/
touch fuse_connection.cfg
vim connection.cfg
mkdir tpc
sudo mkdir /mnt/blobfusetmp -p
sudo chown <user> /mnt/blobfusetmp/
sudo blobfuse /home/mathieu/azure/tpc --tmp-path=/mnt/blobfusetmp --config-file=fuse_connection.cfg -o attr_timeout=240 -o entry_timeout=240 -o negative_timeout=120  -o allow_other
Now we can copy the files from tpc and put them where we want on the VM.
Everything happens in the TPC-DS tools root folder. We used the dsdgen tool of the TPC-DS suite, which is the data generation tool. Queries are generated in ANSI sql by qgen, but Fivetran already updated them to T-SQL (Microsoft), correcting some bugs on the way, so we used their version.
Our first step was to compile the tool:
cp Makefile.suite Makefile
cat Makefile | grep LINUX
make
Then we created a bash script called generateTcpdsData.sh, which launches the dsdgen tool in parallel on multiple cpu, allowing to play easily with the parameters:
#!/bin/sh

# Generate test data on the large server
# You will need to have the tpcds dsdgen program built in the current directory
# mm:
#	Usage:
#       	To be run on generation VM
#	Input:
#		$1 : number of CPU
#		$2 : size of the batch in Gb
#		$3 : rngseed of the batch
#	Ouput:
#		files will be on ${TPC_DS_HOME}/tpcds_1000/
CPU=$1
SCALE=$2
SEED=$3
FOLDER=$4
seq 1 $CPU \
  | xargs -t -P$CPU -I__ \
      ./dsdgen \
        -SCALE $SCALE \
        -DELIMITER \| \
        -PARALLEL $CPU \
        -CHILD __ \
        -TERMINATE N \
        -RNGSEED $SEED \
        -DIR FOLDER
Now, we run the script:
chmod a+x generateTcpdsData.sh
generateTcpdsData.sh 16 1000 42 ./tpcds_1000/
To let this run without the need for keeping your ssh-connection to the VM alive, you could run it inside a screen.
Polybase is the Microsoft translator (integrated in Azure Synapse) that enables virtualization of a bunch of text files from a blob folder into an external table in Synapse. More information about this tool on Microsoft documentation.
This article was written before the new COPY-statement was general available. Microsoft encourages to use COPY from now on.
TCP-DS dgen generates files with ISO-8859-1 encoding. Sadly, Polybase does not support this as input: files need to be UTF-8 encoded. So we need to convert the generated file first. Simply go to the folder and use the iconv command:
iconv  -f ISO-8859-1 -t UTF-8 customer_1_16.dat > customer_1_16.utf8
rm -rf customer_1_16.dat
mv customer_1_16.utf8 customer_1_16.dat
Do this for every file.
Snowflake does not need this conversion as Snowflake supports most popular character sets.
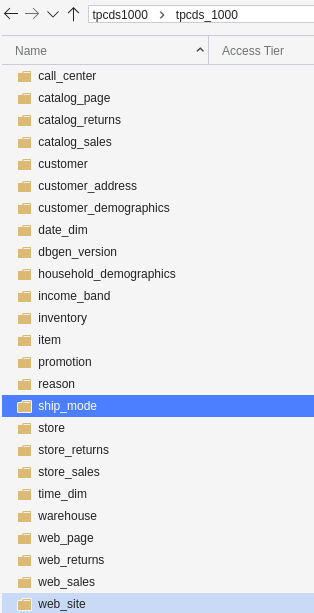
We put the files into separate folders named as the tables. This simplifies the load into the warehouse as the folder will be virtualized as one external table, transparently combining all data from all files in this folder.
We did this part manually (mkdir and mv):
We used Azcopy to transfer data to the blob, following this documentation. Install this in the VM.
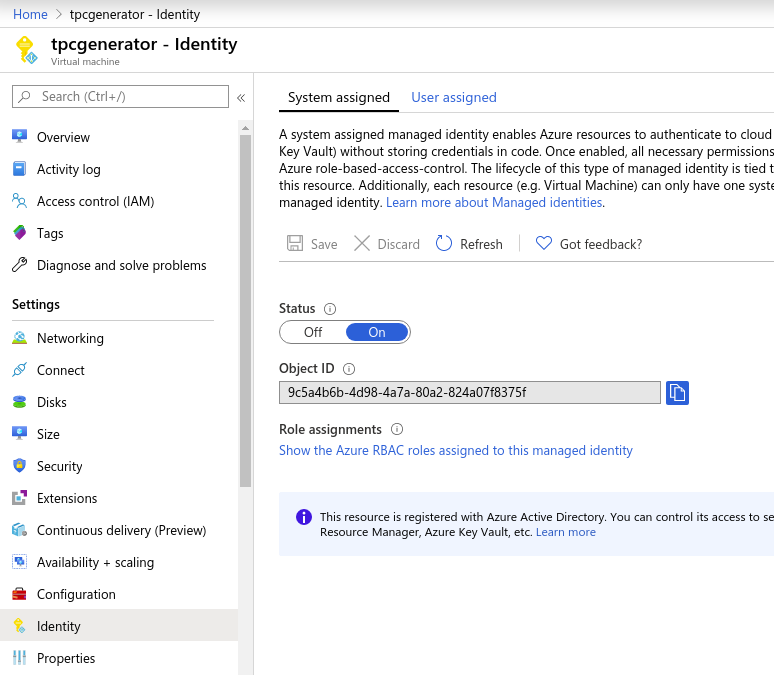
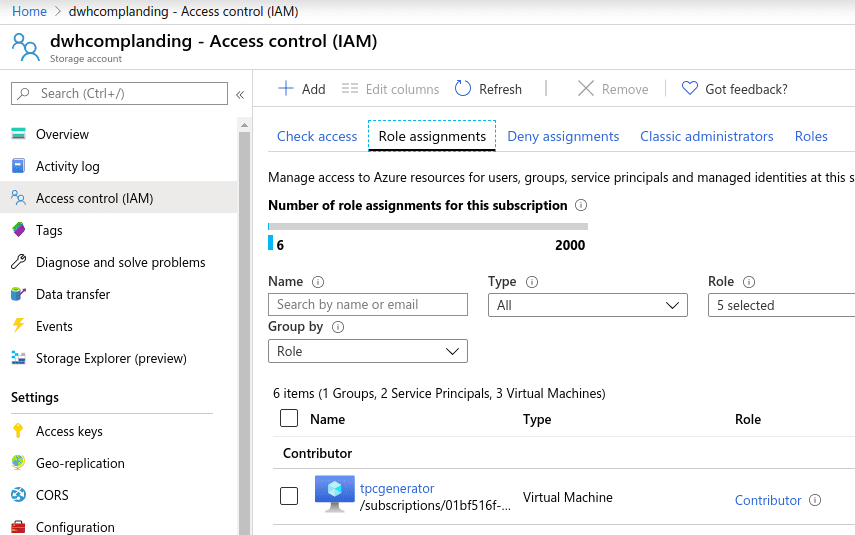
On Azure Portal, we modified the VM Identity to activate “System assigned identity”, to be able to grant roles on other resources inside our Azure subscription. This allowed us to add the VM as a “Contributor“ inside the Blob resource IAM in the portal to have rights to write from the VM to the Blob.
After adding the variable to optimize the copy, we simply launched it using this commands:
export AZCOPY_CONCURRENCY_VALUE=256
export AZCOPY_BUFFER_GB=60
azcopy login --identity
azcopy copy '/tpc_disk/tpcds_1000' 'https://dwhcomplanding.blob.core.windows.net/tpcds1000' --recursive --overwrite
Do this in a screen as well if you don’t trust your ssh-connection to stay alive while copying.
Next up, we will explain in depth how to create and set up a Snowflake and a Synapse DW and ingest the data we just generated into them. In a final article, we will run the benchmarks and compare the results.