RINF 2026: What Railway Infrastructure Managers Need to Know
Visit our dedicated RINF roadmap site: roadmap2rinf.eu The European railway infrastructu ...


Published on: May 10, 2021
The data platforms we make for our clients at Kapernikov often run in Kubernetes clusters. To be able to develop quickly, having a local Kubernetes cluster that is as fully featured as possible but still runs on limited hardware helps keeping development speedy (alongside CI/CD pipelines, GitLab flow, and the use of technologies like Skaffold).
So we evaluated the different options out there and we came up with a way of deploying Kubernetes that we feel is optimal for our use.

First and foremost, there are some things to note:
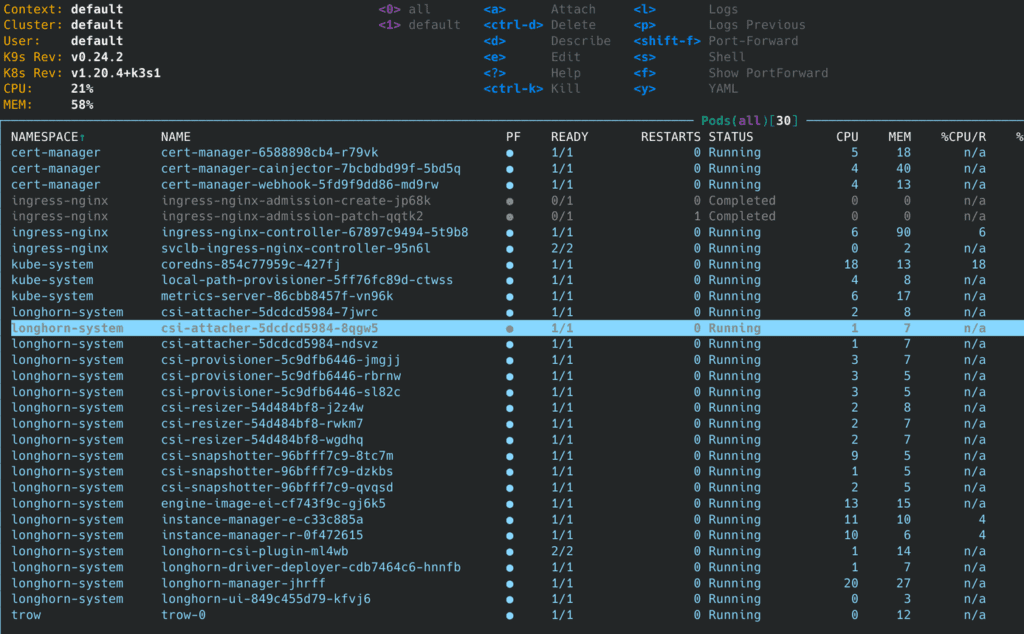
To illustrate the overhead of running Kubernetes locally, following is from a K3s running on a Raspberry Pi 4b, with Trow, Longhorn and NGINX, but otherwise idle (no real workload). The cluster was installed on a Vanilla Ubuntu 20.04 following the K3s instructions below.

At the moment, we think that K3s (or its containerized cousin k3d) is the best option for local Kubernetes deployment.
While it is possible to run Kubernetes in VMs (see minikube or Multipass) in Windows, a bare-metal Linux installation is strongly recommended when doing serious development on Linux containers. Kubernetes overhead is non-negligible on bare-metal already. This is much worse in a VM (don’t be fooled by the fact the linked issues are closed.).
Irrespective of which local Kubernetes version you use, you always need the client tools. Most of the client tools nowadays are written in Go and packaged as static binaries. So to install them, you don’t need a package manager, just download the binaries and put them in /usr/local/bin
Ubuntu users: do not use Snap to install client tools like Kubectl and Helm. They come sandboxed and often they cannot access your whole filesystem. This will get you in trouble.
We use the following tools:
The following shell snippet will install all tools we always use:
curl -LO "https://dl.k8s.io/release/$(curl -L -s https://dl.k8s.io/release/stable.txt)/bin/linux/amd64/kubectl" && \
sudo install kubectl /usr/local/bin

curl https://raw.githubusercontent.com/helm/helm/master/scripts/get-helm-3 | bash

curl -Lo skaffold https://github.com/GoogleContainerTools/skaffold/releases/download/v1.26.1/skaffold-linux-amd64 && \
sudo install skaffold /usr/local/bin/

curl -Lo k9s.tgz https://github.com/derailed/k9s/releases/download/v0.24.10/k9s_v0.24.10_Linux_x86_64.tar.gz && \
tar -xf k9s.tgz  && sudo install k9s /usr/local/bin/

curl -Lo kubectx https://github.com/ahmetb/kubectx/releases/download/v0.9.3/kubectx && \
sudo install kubectx /usr/local/bin/
skaffold dev makes extensive use of inotify in Linux. So it makes sense to increase the limit, and add the following lines to /etc/sysctl.conf:
fs.inotify.max_user_watches=1048576
fs.inotify.max_user_instances=1000000
Then reload sysctl:
sudo sysctl --system
When using dependent artifacts in Skaffold, make sure to use current Skaffold master branch or at least version v1.22. In lower versions, sync won’t work properly for files that are used by “parent” artifacts of a dependent child artifact.
For us, a Kubernetes cluster that is suitable to do serious testing has to support the following:
No virtualisation (so not too heavy).
Installation is very, very easy (if running Ubuntu or something else that knows Snap).
Easy installation of extras (Ingress, storage, a Docker registry).
Can be single node or multi node.
Comes as a Snap package.
Since the move from Docker to containers, it takes a long time to restart (this seems to be a bug, which might get fixed soon).
Kills the battery life of your laptop even when nothing is running on it.
“DNS” and “RBAC” are disabled by default. We don’t think this makes any sense. Confuses new users. Easy to enable, but still…
The installation is very simple:
snap install microk8s
# now enable some essential stuff
microk8s.enable dns storage rbac

# install some stuff that might be more optional
microk8s.enable ingress registry

# make sure you have ufw disabled or your pods won't have network!
ufw disable

# now get the config
mkdir -p ~/.kube
microk8s.config >> ~/.kube/config
When not in use, you can microk8s.stop to save the battery life of your laptop. You can then microk8s.start again when you need it.
Could be used for production deployments on the edge.
Contains some specific optimisations to make it more efficient in small clusters (1-node) or on low end hardware. At first sight, it seems easier on battery life than MicroK8s (but the overhead is still there).
Comes as a single binary or install script.
Installation is easy.
No virtualisation (not too heavy).
Can be single node or multi node.
Starts in 15sec and consumes 512mb of RAM. You won’t find anything lighter.
Uses Traefik Ingress, no NGINX (see below for a solution). Which means that you often can’t copypaste a lot of snippets which assume NGINX.
No built-in registry (see below for a solution).
Stopping K3s leaves the containers running. This is intentional, but maybe not what you expect. Use the “k3s-killall.sh” script to stop it for real.
K3s comes with traefik ingress controller by default. We will not use this (instead we will use nginx because it’s more widely used), so we disable traefik.
## write a configfile to disable traefik
sudo mkdir -p /etc/rancher/k3s
cat << EOF | sudo tee /etc/rancher/k3s/config.yaml
disable:
    - traefik

#### DISABLE LEADER ELECTION : reduces CPU usage, but DO NOT DO THIS if you are going to run
#### a multi-node cluster!!!!
kube-controller-manager-arg:
    - "leader-elect=false"
    - "node-monitor-period=60s"

EOF
## "normal" installation
sudo bash -c "curl -sfL https://get.k3s.io | sh -"
K3s can be started and stopped with systemd, so systemctl stop k3s will stop K3s and systemctl start k3s will start it. However, stopping K3s will leave all containers running. To kill all containers, run sudo k3s-killall.sh.
Once K3s has finished startup, you will find a kubeconfig in /etc/rancher/k3s/k3s.yaml. This configfile can be copied to your .kube/config. When you want to merge multiple kubeconfigs in one, use this guide.
mkdir -p $HOME/.kube
sudo cat /etc/rancher/k3s/k3s.yaml > $HOME/.kube/config
Install the NGINX Ingress controller as per this guide.
kubectl apply -f https://raw.githubusercontent.com/kubernetes/ingress-nginx/controller-v0.44.0/deploy/static/provider/baremetal/deploy.yaml
Now, this creates the Ingress service as a NodePort, which means it will be accessible to the outside world, but on a random port, not port 80/443. This is a nuisance, because this would require us to set up additional portforwarding or iptables rules. Fortunately, K3s has a built-in loadbalancer. We can just patch the service to make it of type LoadBalancer to make use of it:
kubectl patch -n ingress-nginx service ingress-nginx-controller -p '{"spec": {"type": "LoadBalancer"}}'
We will make this CA trusted by our local computer, so that the certificates we will issue will work in our own Chrome (not somebody else’s) and for our own Docker daemon. If you do this in the cloud, use letsencrypt instead of CA.
# install cert-manager 1.2.0
kubectl apply -f https://github.com/jetstack/cert-manager/releases/download/v1.2.0/cert-manager.yaml

# creating a local CA (letsencrypt won't work for localhost)
mkdir -p $HOME/kubeca && cd $HOME/kubeca
[[ -f ca.key ]] || openssl genrsa -out ca.key 2048
[[ -f ca.crt ]] || openssl req -x509 -new -nodes -key ca.key -subj "/CN=local_k3s" -days 3650 \
  -reqexts v3_req -extensions v3_ca -out ca.crt
kubectl create secret tls ca-key-pair \
   --cert=ca.crt \
   --key=ca.key \
   --namespace=cert-manager


# lets create a cluster issuer that will issue certificates using our newly created CA
cat << END | kubectl apply -f -
apiVersion: cert-manager.io/v1
kind: ClusterIssuer
metadata:
  name: selfsigned-ca-issuer
  namespace: cert-manager
spec:
  ca:
    secretName: ca-key-pair
END
Now we have our CA up and running, but we also need to make sure our system trusts this CA. We do this as follows:
# let's make sure our computer trusts this CA!
sudo cp ca.crt /usr/local/share/ca-certificates/selfsigned-k3s.crt && sudo update-ca-certificates
# now restart docker or docker login won't work!
sudo systemctl restart docker
sudo systemctl restart k3s
Note that both Firefox and Google Chrome don’t look at the CA certificates data. If you want the certificate to be valid in Firefox/Chrome, you will need to take extra steps that are dependent on the browser you are using. For instance, for Firefox, instructions are here.
dirname $(grep -IrL 'p11-kit-trust.so' ~/.mozilla/firefox/*/pkcs11.txt) | xargs -t -d '\n' -I {} modutil -dbdir sql:{} -force -add 'PKCS #11 Trust Storage Module' -libfile /usr/lib/x86_64-linux-gnu/pkcs11/p11-kit-trust.so
After doing this, restart Firefox.
First, let’s create a Trow namespace and a https certificate:
kubectl create namespace trow

# let's create a SSL certificate for our container registry
cat << END  | kubectl apply -f -
apiVersion: cert-manager.io/v1
kind: Certificate
metadata:
  name: trow-kube-public
  namespace: trow
spec:
  secretName: trow-kube-public
  issuerRef:
    name: selfsigned-ca-issuer
    kind: ClusterIssuer
  commonName: trow.kube-public
  dnsNames:
  - trow.kube-public
END
After our certificate is created, we can install Trow. To do this, we need a hostname and an ip address that will be accessible both from outside our cluster and from inside our cluster. This is not so simple: we cannot use localhost or 127.0.0.1 because it doesn’t have the same meaning from outside our cluster (there it will be our pc) and inside our cluster (there it will be the current pod). So we will take the first local LAN ip address of our host. We will use /etc/hosts to make a name alias for this ip address. From then on, trow will be accessible via trow.kube-public.
# let's fake a DNS entry!
MYIP=$(hostname -I | cut -d' ' -f1)
echo "$MYIP trow.kube-public" | sudo tee -a /etc/hosts
On laptops this can be problematic: there, when you connect to another wifi network, you will get another local ip address, and your /etc/hosts file will not be valid anymore. This can make you lose a couple of time since the error message might be cryptic (like “SSL verification error”) as the “old” ip might now be taken by something else. So whenever you switch networks, check your /etc/hosts!
A solution is writing a script that automates updating /etc/hosts whenever your ip address changes.
The following install script installs a systemd service that will auto-update /etc/hosts whenever your ip address changes. You can put the aliases you want in /etc/update_hosts_file/aliases (put them all on the same line, separated by spaces). Don’t put comments in that file!
#!/bin/sh


cat << END | sudo tee /etc/systemd/system/ip-change-mon.service
# /etc/systemd/system/ip-change-mon.service

[Unit]
Description=IP Change Monitor
Wants=network.target
After=network-online.target

[Service]
ExecStart=:/bin/bash -c "ip mon addr | sed -nu -r \'s/.*[[:digit:]]+:[[:space:]]+([^[:space:]]+).*/\\1/p\' | while read iface; do systemctl restart ip-changed.target; done"

[Install]
WantedBy=multi-user.target default.target
END


cat << END | sudo tee /usr/local/bin/update_hosts_file.sh
#!/bin/bash

export MYIP=\$(/usr/bin/hostname -I | cut -d' ' -f1)
export ALIASES=\$(cat /etc/update_hosts_file/aliases)
sed -i '/UPDATE_HOSTS_FILE/d' /etc/hosts
echo "\$MYIP \$ALIASES ### UPDATE_HOSTS_FILE" | tee -a /etc/hosts

END
chmod u+x /usr/local/bin/update_hosts_file.sh

cat << END | sudo tee /etc/systemd/system/ip-changed.target
# /etc/systemd/system/ip-changed.target

[Unit]
Description=IP Address changed
END

cat << END | sudo tee /etc/systemd/system/updatehosts.service
[Unit]
Description=Updates the host file to fake DNS entries.
PartOf=ip-changed.target
Before=ip-changed.target
StartLimitBurst=20
StartLimitIntervalSec=5

[Service]
Type=oneshot
ExecStart=/usr/local/bin/update_hosts_file.sh
RemainAfterExit=true

[Install]
WantedBy=multi-user.target
END
mkdir -p /etc/update_hosts_file

[[ -f /etc/update_hosts_file/aliases ]] ||  echo "trow.kube-public" > /etc/update_hosts_file/aliases

systemctl enable --now ip-change-mon
systemctl enable --now updatehosts
If you ever want to remove this, do systemctl disable ip-change-mon && systemctl disable updatehosts and remove the files /usr/local/bin/update_hosts_file.sh, /etc/systemd/system/updatehosts.service, /etc/systemd/system/ip-changed.target, /usr/local/bin/update_hosts_file.sh, /etc/systemd/system/ip-change-mon.service.
# let's install trow
helm repo add trow https://trow.io
helm install trow trow/trow \
         --namespace trow \
         --create-namespace \
         --set 'trow.domain=trow.kube-public' \
         --set 'ingress.enabled=true' \
         --set 'ingress.hosts[0].host=trow.kube-public,ingress.hosts[0].paths={"/"}' \
         --set 'ingress.tls[0].hosts[0]=trow.kube-public' \
         --set 'ingress.tls[0].secretName=trow-kube-public' \
         --set trow.user="" --set trow.password="" \
         --set 'ingress.annotations.nginx\.ingress\.kubernetes\.io/proxy-body-size'="512m"
When using Skaffold on Trow, you will find that quickly, a lot of Docker images will pile up in your container registry, which will eat your disk space. Instead of carefully cleaning them up, we simplu uninstall and reinstall Trow every now and then.
The default hostpath provisioner (also in use by the other solutions) doesn’t support ReadWriteMany volumes. As a solution, we’ll install one that does.
NFS Ganesha
NFS Ganesha allows for RWX volumes by taking a system-provided volume and launching a userspace NFS server on it. It won’t be the fastest performance, but it’s lightweight (only 1 pod, rather than tens of pods for Longhorn).
# need nfs utilities on the host. that's the only dependency!
sudo apt install nfs-common
cd /tmp
git clone https://github.com/kubernetes-sigs/nfs-ganesha-server-and-external-provisioner
cd nfs-ganesha-server-and-external-provisioner/deploy/helm
helm install nfs-server-provisioner .  \
  --namespace nfs-server-provisioner --create-namespace \
  --set persistence.storageClass="local-path" \
  --set persistence.size="200Gi" \
  --set persistence.enabled=true
Note, this is not to be used in production (Longhorn is better in that case).
Longhorn
As an alternative to Ganesha (recommended by K3s, but there seems to be more overhead), one can install Longhorn.
This requires open-iscsi:
sudo apt install open-iscsi nfs-common
After this, we can install Longhorn like this:
kubectl apply -f https://raw.githubusercontent.com/longhorn/longhorn/master/deploy/longhorn.yaml
This creates a whole lot of resources and works fine.
This is the case for all Kubernetes distributions!
systemctl stop --user gvfs-udisks2-volume-monitor
For KDE, follow instructions here.