CopernNet : Point Cloud Segmentation using ActiveSampling Transformers
In the dynamic field of railway maintenance, accurate data is critical. From ensuring the health of ...


Published on: January 20, 2022
We may have convinced you earlier of the benefits of continuous integration (CI). But implementing this methodology into your business and workflows is another story. Where do you start? And how will you convince <enter the names of your bosses and colleagues here> to support you and invest in this journey?
With new projects, you often have the luxury to start from scratch and make all-encompassing changes. But to introduce CI into your workflow, you will need to take into account legacy code, deadlines for new features and continuous refactoring. That is why we recommend an iterative approach with clear short-term benefits.
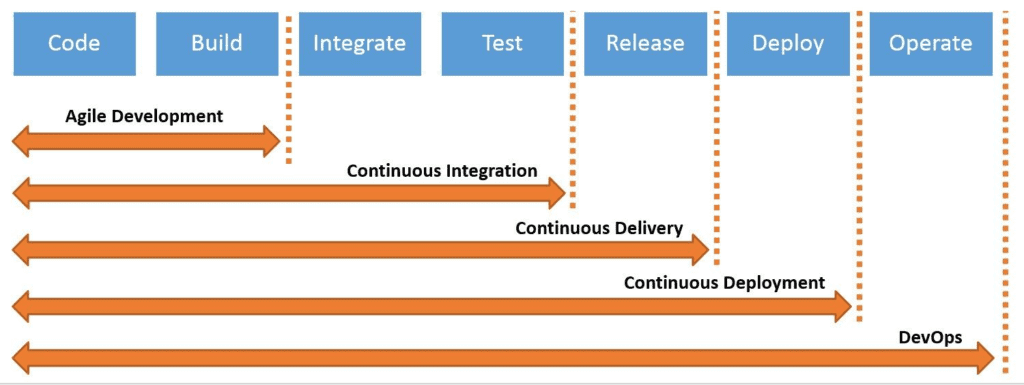
The picture below shows how CI fits in the journey towards a full DevOps software development cycle. The functional blocks on the left will lay the groundwork for the blocks on the right. Once you have continuous integration covered, then implementing continuous delivery or continuous deployment will be easier and more useful. Conversely, it’s dangerous to skip steps along the way. For example, it does not make sense to implement DevOps if you haven’t figured out how to do continuous integration first. . It’s a good thing to keep this in mind during your journey to CI Valhalla.
Let’s have a look at the different steps you need to take to successfully implement CI into your workflow.
Version control systems are essential for writing software, even if your software team only consists of one developer. If you haven’t got this covered yet, then any version control system (Git, SVN, CVS, Perforce) will do. However, we recommend Git, because it combines power and an extensive ecosystem.
If you are new to this, create an account on github or gitlab. We recommend keeping everything in version control that is related to the creation of software. Commit often and perfect later, that is your credo from now on.
Automatically building your software commit before it makes it into the product has several benefits for your product and your team:
Most software is assembled into one or multiple release entities. These include binaries, packages, or container images that make up your software release (what you ship to the customer). When we talk about ‘your build’, we mean the whole software assembling process from source code to one or more of these release entities into a new version of your software.
A broken build – developer slang for a broken assembly process for release entities – is annoying. Fixing someone else’s build is even more irritating. Multiply this with your entire software team (of course everyone will discover and fix a broken build in parallel) and the result is a huge waste of time and effort, especially if you adhere to your team’s ‘don’t break the build’ policy. Certainly, you don’t want to leave something this important to mere policy.
The solution is simple: build every software commit before it makes it into the product. Doing this manually is not an option though, because that’s very time-consuming. But your favorite (build) automation software will be happy to do this for you.
Today, most services that provide VCS systems also provide built-in, easy to configure build automation services. If you are looking for one, there are a myriad of good choices in the cloud (Gitlab, Github, Travis-ci, Circle CI, Azure Pipelines), self-hosted (Jenkins, Teamcity) and cloud-native (Jenkins-X, Tekton).
Keep the following things in mind when you implement the automatic build steps:
Publishing your releases to a central repository has many benefits:
In contrast, releasing from a developer computer is far from ideal:
In step 1, we described how you can build software automatically. Now extend the automation on your stable and/or release branches with additional release steps. Automatically publish these release entities (most build automation systems call them artifacts). Publishing here can be as easy as pinning a certain build, or uploading it to a shared drive or artifact repository like Artifactory.
This step yields the following direct benefits to your product & team:
So, you have a build and release that is automatically generated by your CI. If you want to know whether your CI releases work at all, now and in the future, then you can eliminate risk by starting the application and seeing whether everything goes as planned.
Let’s take this one step further and automatically start the application on each commit. Ideally, you run this test as a step in your CI, using an environment that is as clean as possible. With ‘clean’, we mean starting from a vanilla (operating) system (most operating systems exist as a minimal, off-the-shelf public container). Then, explicitly install and configure everything your application needs to properly run.
‘Does my application boot’ is the first thing you should schedule for your automated tests. Once that is covered, you can incrementally add system tests when opportunities arise.
You can keep your boot test very easy with a few scripted lines, but nevertheless we recommend using a proper testing framework.
Add automated system tests for the most important features to the testing framework you have set up in the previous step. This will help your team to:
An application which starts successfully is important to keep your customers happy. But you want to do more with your application than that. This is a good moment to add automated system tests for the most important features to the testing framework you have set up in the previous step.
Limit yourself to a few core features and prioritize quality over quantity: focus on writing stable, repeatable tests. This may require refactoring your application to make it more testable. Go the extra mile to make this happen. The decision to take shortcuts will forever haunt you.
Refactoring your code has other benefits as well. Testable code overlaps significantly with good software design principles. For example: testable design requires low coupling of components and specialization of components to do one thing well. It requires the developer to actually use the interface of the component, rather than blindly let necessity dictate it.
This step yields the following direct benefits to your team:
Having a suite of system tests for testing your core functionality is great. However, running system tests may take a while to set up and may require resources that are not available to every team member all the time. In addition, the long feedback loop between implementing a feature and testing it (we call this an iteration) is not ideal.
By running unit tests, you assess the smallest logical blocks of your software – typically single functions of coding. Unit tests can isolate small, logical blocks from all other code, resulting in a test suite that any developer can run on his computer. In addition, they allow you to properly test your error cases. A good unit test is independent, deterministic and completed quickly. Together, this results in much faster iteration times when developing software. Since you will eventually end up with many unit tests, being able to filter which unit tests to run is essential.
Unit tests do something similar to what system tests do to the interface and design of your software components, but then for your component’s internal parts. Once again, prioritize quality over quantity, as your team will have to maintain the tests in addition to the production software.
The road to implementing continuous integration may seem daunting at first. But by taking it one crossroads at a time and by focusing on short-term benefits, your team and product will gradually and incrementally reap the benefits from this methodology.
The above five steps will help you start your journey, and will allow you to pause or change along every step of the way.
Subscribe to our newsletter and stay up to date.